Equipping Your Own DIY Hunting Trailer
Bernie Barringer 04.22.16
Returning from a DIY hunting adventure in some state far away often found me with a big mess in the back of my truck. When I left home, everything was organized, but halfway through the trip it turned into a jumble. Loading and unloading a pickup for hunting trips seemed like a never-ending string of unnecessary work. Wouldn’t it be nice to have everything organized in a trailer, then just back up to it, hook up and go?
Over time I developed a plan in my mind, thinking about what I would like to have that would make my life easier when on a hunting trip. That plan came to fruition last fall when I bought a trailer, and during this winter when it became my project to convert it into a functioning hunting trailer to haul my gear and it has some additional features.
First I knew I wanted to be able to butcher a deer and keep the meat in good shape for the trip home, or the trip to my next hunting destination. One of the biggest issues I have run into on past hunts was shooting a deer on the first stop of a two- or three-state hunting trip. What to do with the head, hide and meat can be a real problem. I added a small chest freezer to the trailer. Once everything is frozen, even when the freezer is unplugged it will stay frozen for about two to three days depending on the outside temperature. If you open it, cut that time by about three hours each time you open it.
At other times, I found myself hunting far from a place to sleep. In western Nebraska, I came out of the woods at dark and my motel was more than an hour away. I needed to be back there well before daylight in the morning. I considered sleeping in my truck; but, at that point, the idea of having a bunk to crash in sounded much better than driving nearly three hours of the next eight.
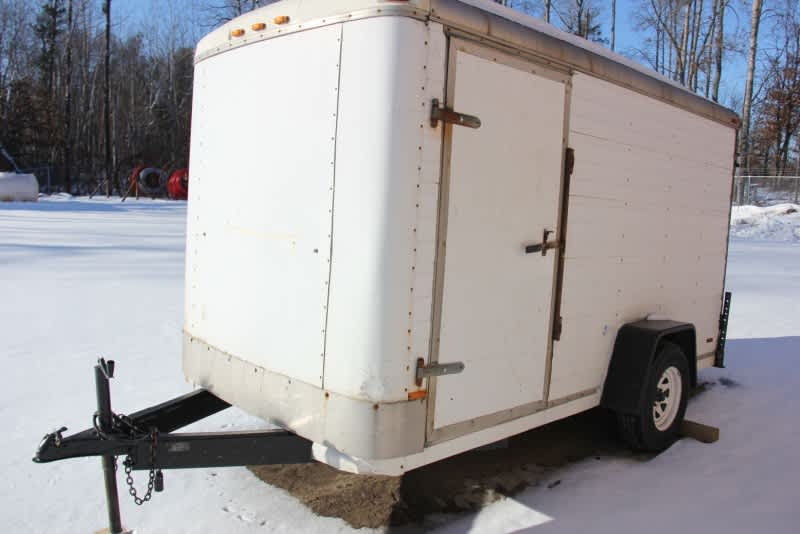
These factors weighed into my choice to build a trailer just the way I wanted it. When looking for a trailer, I knew I wanted one with a ramp door in the back rather than the swinging barn doors. I don’t take an ATV on DIY hunts often, but when I do, I wanted to be able to put it in the trailer. Plus the ramp door just makes it easier to move stuff in and out of the trailer.
I finally settled on a 6-foot wide by 12-foot long trailer and bought it for $1500, about half the cost of a new one. The previous owner of the trailer used it to race go-carts. I first tore the old grubby shelving out and painted the interior an off-white color.

At Menards, I bought two kitchen cabinets, one is an overhead, the other a corner cabinet. These did not have any latches on the doors or drawer, so I bought latches and installed them so they would not come open on the roadway, allowing their contents to fall out onto the floor.
Each of the cabinets was installed in such a way that they were screwed to the vertical steel ribs of the trailer’s sidewall. The paneling is not strong enough to hold them. They nicely hold the accessories that I need on DIY hunts, it’s much easier than digging through totes.
Next, I installed the chest freezer in the front of the trailer, using a ratchet strap to keep it in place. The trailer had lighting but it was poor, so I went to an RV dealer and picked up some new LED overhead lights. I installed one in the middle of the roof and one over the top of the freezer so it’s easy to see the contents.

I installed a 12-volt Deep Cycle battery for DC power, and ran the lights to it. The lights and battery are connected to the truck’s battery when the truck is plugged into it, which keeps the deep cycle battery charged. I also installed an outlet strip which can be plugged into 110V AC power when I am parked where electricity is available. This also allows me to use a generator. I will probably install an onboard boat battery charger that will top off the battery each time it’s plugged into AC power.
On the driver’s side of the trailer wall, I installed some hooks for hanging clothing, an extension cord, etc. On the other side, I installed hooks into the angle iron that runs along the top of the wall. On these I hung three treestands and fastened them with bungee cords so they do not flop around during travel. I used a square carpet remnant—usually available at no cost or low cost at any carpet store—to protect each stand and the wall from vibration.
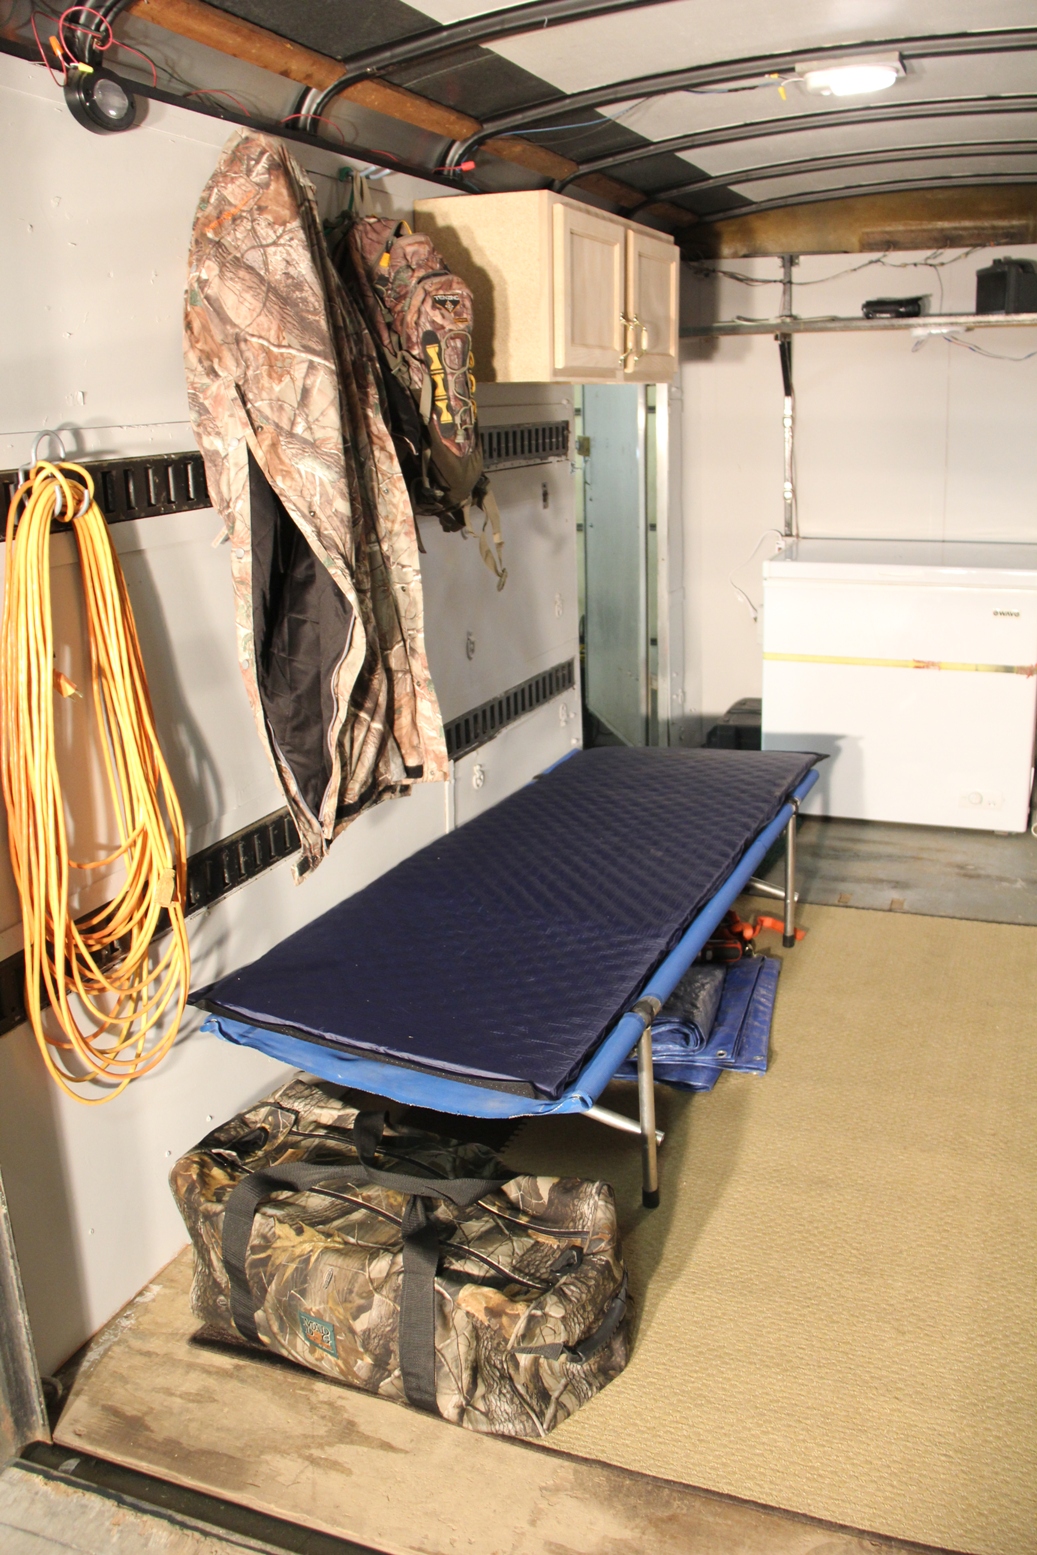
This trailer can be set up several ways. I tossed a large rug on the floor and put a cot along one wall. With a self-inflating pad and sleeping bag, this makes for a comfortable camp. I can use a small electric heater when the trailer is plugged in. If I find that I want to use propane heat in the future, I will need to add a vent of some sort, maybe a small window that I can open a little to get air circulation.
The other way the trailer can be set up involves a folding table with PVC pipes to make it taller. Having it at belly-button height makes it a lot easier to work on things. This table fastens to the wall and is perfect for cutting up and wrapping a deer.
Either the sleeping area or the butchering are can be folded out of the way to allow room for an ATV or a lot more gear. Right now it has plenty of room for my hunts, but I occasionally hunt with a buddy or two. In that case more room for gear would be needed.

So far I love the way I have this trailer set up, but I’m betting as I use it, I will find ways I want to tweak it. I regret that I didn’t paint the floor, but I can do that later. I have floodlights on the back that light up the area behind the trailer and ramp. I can see adding a winch to pull an elk into the trailer at some point. You never know where this will lead.
You can watch a video of how the trailer is built below:

