A Comprehensive Guide to Making Your Own Crimson Trace Lasergrips
Tom McHale 10.22.14
I always thought I was pretty handy, at least until today. Then I got humbled.
You see, I had the opportunity to build my very own Crimson Trace LG-401G Lasergrips for a 1911 pistol. I was visiting the Crimson Trace factory in Wilsonville, Oregon, just south of Portland, and those crazy folks seemed to believe that even a klutz like me could make something high-tech like a four-milliwatt, instinctive-activation pistol laser. But they didn’t have enough faith in my technical ability to turn me loose on the factory floor unsupervised.
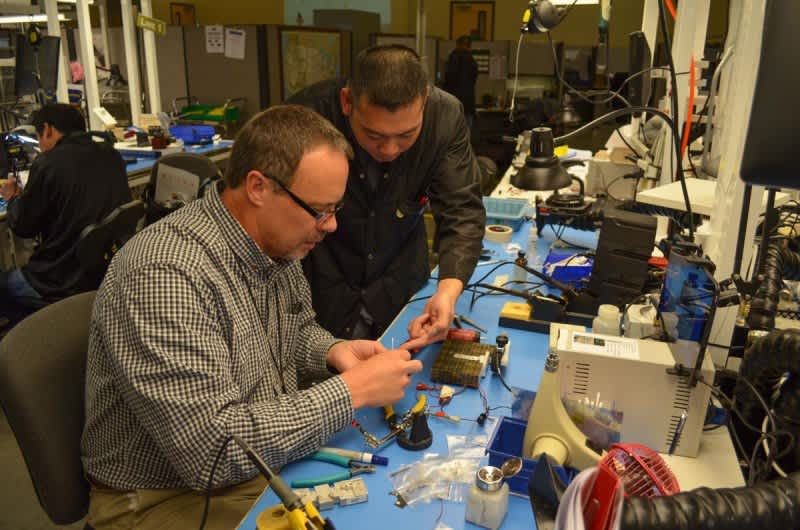
Tong was the engineer who humbled me, but he was really nice about it. He let me make some mistakes, then gently corrected my little messes while teaching me the right way to do things. I actually worked with Tong on two sets of grips. He built the first set, while carefully instructing me on the intricacies of each step in the process, and there were a lot of them. I then took the driver’s seat and started on the Lasergrips that I would build, then take home with me, to install and use on one of my 1911s.
Making your own Lasergrips is easy. In fact, pretty much anyone can do it. Just assemble the following tools and facilities, then we’ll walk through the process together here. Go ahead, I’ll wait til you’re ready.
An armory
I’m assuming you have more than one gun, so you’ll need at least a dozen guns of each type for the laser you want to design and build. Some of them will be used for performance testing. A laser has to be built to absorb recoil in the x, y, and z axes tens of thousands of times. Oh, the grips and electronic components inside have to deal with rotational forces as well. You’ll wear out a few guns until you get the laser and interior components design just right.
Some of the guns you’ll need to chop apart into pieces. This is the part where you and I both cry. Chop up perfectly good guns? Yep, it’s all for the cause. When you assemble the grips, you’ll want to do it on the actual gun frame you’re making the laser for, not a copy that might have slight dimensional variances. The best way, how Crimson Trace does it, is to chop off the grip end of the frame of an actual gun to make construction jigs. Of course you’ll need to make multiple sets of these so you can meet the required production volume.
An indoor shooting range
You’ll want to install an indoor shooting range, hire an armorer to keep all the guns in the armory running, and then train staff members to perform the hundreds of thousands of rounds of live fire testing. Believe it or not, there will be too much shooting for just one person to handle. Don’t forget to install lead management ventilation systems—and soundproofing so you don’t tick off the neighbors.
An engineering testing lab
If you’re going to do it right, you need testing facilities in house for non-shooting performance testing. You’ll need electrical testing equipment to make sure your battery and power management designs are up to par. You’ll also need moisture and immersion testing equipment, because a laser on a gun wouldn’t be of much use if it stops working when it gets a little wet. Don’t forget environmental testing equipment; your Lasergrips will need to perform in exceptionally hot and cold conditions. You’ll also have to account for operational temperature changes—guns get hot when you shoot them a lot.
A collimation lab
Direct green-laser diodes are a raw material that need to be directed, tuned, and tweaked before they’re capable of projecting a neat green dot on target. After you line up your German diode supplier, you’ll need to construct special housings and install the diodes in them so they don’t get smashed to bits by recoil. Oh, and you’ll need to design an adjustable lens that takes the broad, rectangular green light output of the diode and focuses it into a sharp dot at a range of 25 feet. For this application, you can do what Crimson Trace does and construct mirror mazes, so you can focus each and every diode in a smaller space because you’re bouncing the beam out and back via the mirrors. Distance is distance, regardless of how many turns there are.
Component suppliers
You’ll want to line up some local suppliers who specialize in injection molding and rubber materials (and even wood carving if you plan to make Rosewood Master Series Lasergrips). Don’t forget to line up a circuit board manufacturer. They’ll need to include a potentiometer in each set of grip electronics as you need to make sure laser output is less than five milliwatts so the feds don’t hound you. Four milliwatts of output is ideal, so you’ll want equipment to test actual output of each set of Lasergrips you assemble.

Now that you have all that ready to go, you’re ready to start building your own Lasergrips. As I learned, the process is detail-oriented and requires an exceptional amount of skill. It’s not like Legos and the parts are really small. If you don’t do everything perfectly, your carefully-constructed Lasergrips will stop working after the first shot. Even a 9x19mm pistol creates some serious g-forces on the sensitive internal parts.
The first phase of assembly involves a lot of soldering. The hard part is that the wires involved are about the same diameter as human hair and the parts they’re attached to are the size of a match head. This is where skill comes into play. I managed to get things attached, but I couldn’t help notice that Tong discreetly undid most of my work and fixed it, explaining that he was “adjusting it a little.” That’s okay, he and his co-workers have federal soldering certifications, which are required for construction of laser products for military contracts. Anyway, I managed (with help) to get the laser diode wires and master on/off switch soldered to the circuit board. Since these solder connections are going to be subjected to some serious abuse, we covered them all with industrial epoxy to keep things in place over the long haul.
Next, now that you have power switch, circuit board, and focused laser diode all attached, you need to adjust the potentiometer on the circuit board to make sure the laser is running at just about four milliwatts. There’s a screw about the size of a gnat’s left eyeball that you adjust (while beaming the laser though a computerized sensor) to get this right.
Once the electronics are functioning, you’re ready for assembly. First, you need to find and insert the world’s smallest windage and elevation screws into the grips. I couldn’t even see them with my naked eye, but Tong assured me I was putting them in the proper place.
Next, the entire electronics assembly is fastened into the grips themselves. This is where I really butched things up. The circuit board is fastened to the grips with a plastic welding technique. When Tong did it, the weld points were as smooth as glass. My work looked more like the surface of Mars, but Tong assured me my Lasergrips would still work. Don’t ask me about gluing the wires into place. My efforts reminded me of my first attempt at building a plastic model airplane. You know, where you get that special surface coating of model glue on just about everything? Even 12 coats of model paint don’t cover that abomination of excess glue.
Once assembly is complete, it’s time to adjust the sighting. Crimson Trace ships their Lasergrips pre-sighted so the laser dot will be very, very close to point of impact as soon as you install the grips. They do this by creating a “master” grip on which the windage and elevation adjustments are verified by the armorer and tested in that indoor range. The basic idea is to, again using a fancy setup of mirrors, to duplicate the settings of the master grips. Just put your newly constructed grips on the adjustment jig (made from a real gun frame remember) and adjust until the laser dot ends up in the same place as the master grips.
The last step is testing—the moment of truth. I’d soldered, epoxied, super-glued, and plastic welded a bunch of very tiny, and very sensitive, electronic parts together. Good news! My own homemade Lasergrips not only turned on and off, but pointed more or less forward. I considered that a victory.
In the interest of time and space, I’ve skipped quite a few steps, but hopefully you get the idea. It’s hard to appreciate the technology, testing, and manufacturing skill that goes into the gear we buy and use until you actually see the guts and the process. All in all, it was an enlightening experience. See what I did there?
Tom McHale is the author of the Insanely Practical Guides book series that guides new and experienced shooters alike in a fun, approachable, and practical way. His books are available in print and eBook format on Amazon.

