Five Key Tips to Wonderful Wiring: Doing it Right the First Time is the Only Way to Electrical Success
Yamaha 07.12.11

Working on a marine electrical system is a near certainty if you’re a hands-on boat owner. It doesn’t matter if your foray into the jungle of your boat’s wiring is voluntary – adding electronics or accessories, or involuntary – troubleshooting and repairing an electrical malfunction, there is a right way to get the job done.
Each of the following five tips outline the proper methods and materials for common boat wiring scenarios. These aren’t simply our own ideas – they’re a compilation of legitimate Federal Regulations for boat builders from the U.S. Coast Guard (USCG) and best practices established by the American Boat & Yacht Council (ABYC®).
Tip #1 Use Only Marine Wire
Your boat is a dynamic, moving structure that lives its life in a bumpy, damp environment; the wiring must be flexible and corrosion-resistant.
Single strand household wire won’t work – the boat’s inherent movements, vibrations and dramatic temperature changes will break solid single strand wire.
Automotive wire looks a lot like marine wire (as does a lamp cord), but lacks moisture resistance and will eventually lead to corrosion-related failures.
Generically, marine wire is a multi-strand copper conductor that is electroplated with tin (“tinned”) for corrosion resistance, sheathed within a water and high-temperature resistant insulated covering.
Type 3 marine wire, containing the maximum number of individual strands per cross-sectional area, with an insulation rating of BC5W2 (105°C/221°F dry, 75°C/167°F wet) is the best choice for most of the common wiring tasks on a pleasure boat.
Tip #2 Use the Proper Size Wire
Marine wire uses the American Wire Gauge (AWG) system for designating the various wire diameters (gauges). Small gauge numbers indicate a large wire diameter; conversely, small diameter wires carry a large gauge designation.
For example, 0 AWG is about 0.420” diameter (not including the insulation), while 16 AWG is roughly 0.060” in diameter (excluding insulation).

The larger the wire (small AWG size), the more current it will carry, with a minimum amount of resistance.
Remember, direct current (DC) electrical systems use two wires – positive (+) and negative (-).
To determine what gauge wire to use, you must factor in how much electricity (volts), the load of the device (amperage), voltage drop (electricity lost due to the loads and wiring resistance), and the actual length of the wiring run – from the power source to the device and back. This isn’t a straight-line measurement, but the distance through bulkheads and around obstacles; the real world amount of wire necessary to do the job.
Tip #3 Avoid Splices
Using the true measurements from the electrical device to the power source, add a few feet to give yourself a little extra wire, just in case your calculations are off a bit. It’s easier to trim excess wire than it is to splice in an additional couple of feet.
Splices compromise the integrity of the wiring, and are often the sources of hair-pulling troubleshooting exercises as these connections invariably work loose or corrode at the most inconvenient times.
Tip #4 Make Good Connections
Marine-grade crimp connectors sealed with adhesive heat-shrink tubing ensure that connections are solid and repel moisture intrusion.
Don’t skimp and use the cheap stuff from auto parts stores or big-box home improvement centers. Home and auto electrical hardware doesn’t hold up in a rough and wet boating installation.
Marine connectors should be tin-coated copper; no unplated steel or aluminum, no electrical tape or wire nuts are acceptable on a boat.
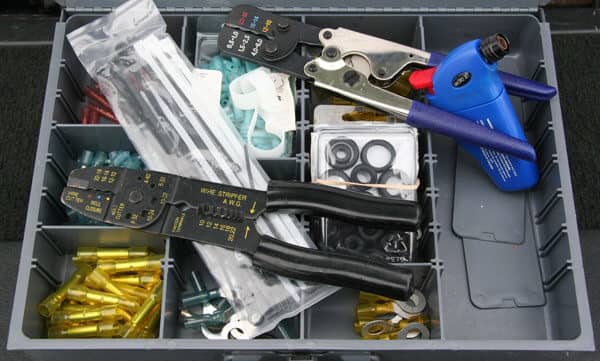
Crimp connectors with a dedicated crimping tool. Ratchet-style crimpers clamp down the connectors precisely every time with a minimum of effort; we recommend these if you’re doing a lot of rewiring on your boat.
Plain hand-held crimping tools are fine for the occasional repair and aren’t as pricey as ratchet crimpers, but you’ll need to practice to acquire a feel for how hard to squeeze the crimpers to prevent crushing the various sizes of connectors.
Tip #5 Keep it High and Dry
Route wiring high in the boat, in a location as protected from the elements as possible to prevent water intrusion into the electrical system.
Also, support the wiring by routing the wires through a rigging tube or heat-resistant conduit (with drainage holes every several inches). Another option is to use plastic hangers or tie-straps (eyelet style) placed approximately 18” apart to secure wiring bundles.
If you must run wires through a bulkhead, use a grommet bushing or sealant/caulking to prevent the wiring from chafing against the sides of the hole in the bulkhead (see illustration to right).
Closing Comments
Electrical theory and marine wiring are vast subjects. We encourage you to take the time to learn more about how electricity works, especially the aspects that apply to keeping your boat charged up, well lit and trouble-free.

The pursuit...
A checkered flag. A scenic panorama unfolding around the bend. A trophy catch. A pulse-quickening stretch of road or trail. Heads turning as you pass by. Even coming home at the end of a hard day's work.
Whatever your pursuit, Yamaha is there, too, pursuing our goals. We want to satisfy our customers and exceed their expectations with products and services of superior quality, unmatched performance, and extraordinary value.
With an ever-expanding line that includes motorcycles, outboard motors, ATVs, personal watercraft, snowmobiles, boats, outdoor power equipment, race kart engines, accessories, apparel, and much more, we at Yamaha Motor Corporation, U.S.A., strive to contribute to the quality of life. Your life.
Life can have many exciting, memorable experiences. Creating opportunities for them is what Yamaha is all about.
