What is Fix’N Wax? And How to Make It!
Morgan Rogue 12.14.21

Fix’n wax was originally designed for waterproofing. However, as time has gone on, more and more people were looking for an ‘all-in-one’ wax that could do pretty much anything. Fix’n wax can’t do everything, but it sure can do a lot more than just waterproofing.
What are the best uses for Fix’n wax?
- Waterproofing
- Fire starter
- Wax your bow string
- Use as a lube for certain tools and zippers
- Shining up your leathers
I’m sure you could get creative with how to use this product, but these are some of the things that I use it for the most. It’s nice to have in the field for various little tasks like shown above.
Many people will use animal fats for their fix’n wax, however, I have opted against doing that because animal fats, in this particular instance, could go rancid pretty quickly and has a higher chance of melting out in the field.
I’m going to be using mineral oil in place of straight animal fat. Mineral oil is still a type of fat, though it might go rancid at some point in our lives, it’ll take a long time and it’ll produce the same results as using animal fat in this application.
If you’d like to try using animal fat instead of mineral oil for fix’n wax, please be my guest and test it out for yourself!
How to make Fix’n wax:
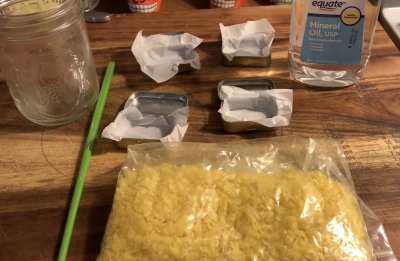
Supplies:
- Beeswax
- Mineral oil
- Wax/parchment paper
- Mason jar
- Mini altoids containers or large altoids containers or almost any container
Instructions:
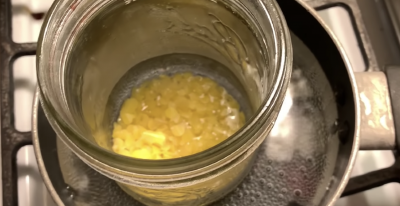
Fill a pot halfway with water. Place the mason jar inside the water, this is called a double boiler method and is the safest method when melting beeswax.
Take 2 tbsp of beeswax and 2 tbsp of mineral oil and place them in the mason jar.
Slowly melt them down into a combined liquid.
Once melted, remove the mason jar and pour them into the parchment paper, inside of your containers.
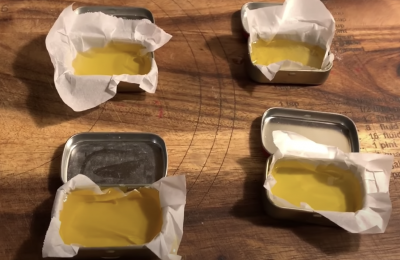
Let them dry for several hours. Depending on the size of your container, they may dry faster, but give them a few hours to fully solidify.
Once they’ve solidified, pop them out of the parchment paper, discard the parchment paper and use as desired!
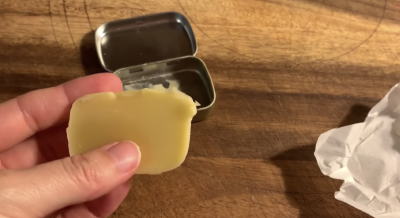
I usually place them back inside of the mini altoids container and carry them that way. At this point you’re able to use the fix’n wax anyway you’d like without it being attached to the container.
I shoot my bow a lot so this has really helped saved me a lot of money when it comes to quickly waxing my string. I’ve also rubbed it on some paper and turned that into a fire starter. The last way I’ve used it is to lube and ‘clean’ tools, it worked great for my multitool!
As for its original purpose of waterproofing, it’s amazing at that. Rub it along some of your pouches, bags or even cloth shoes, keep them in the warm sun for a few hours to ‘solidify’ it into the cloth. It should keep it water resistant for a few days at least. It will need re-applying.
Keep this handy in your gear and it’ll be a great asset when you really need it.

