Field Test: Burris XTR II 5-20x50mm Riflescope
Dave Maas 11.16.17
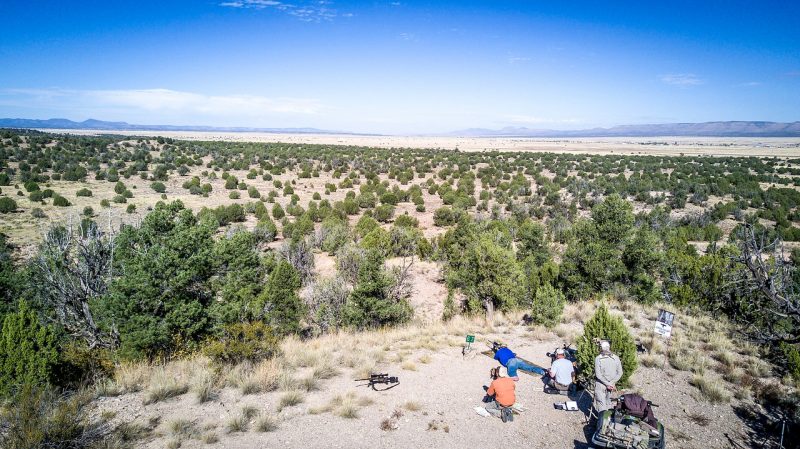
I recently returned from a week-long Precision Rifle 7 Class at Gunsite Academy in Arizona. My goal during this visit was to become a better rifleman — at all ranges — and based on my research, there was no place better to receive this instruction than at Gunsite.
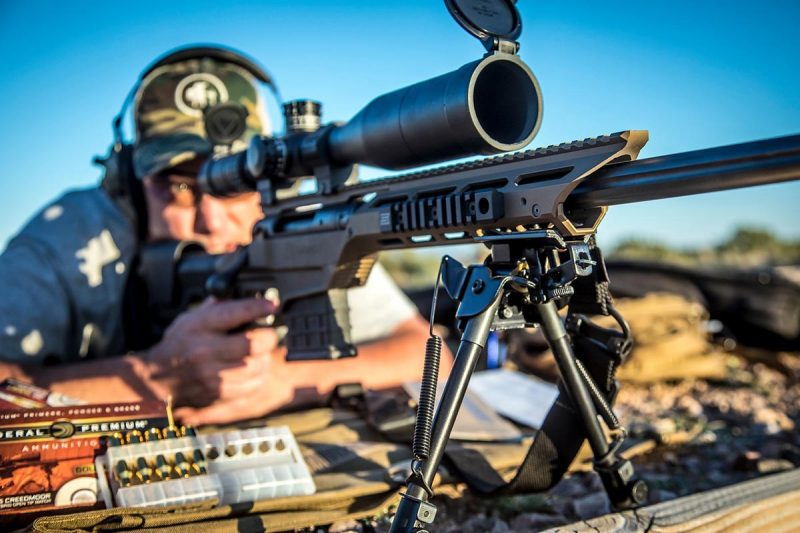
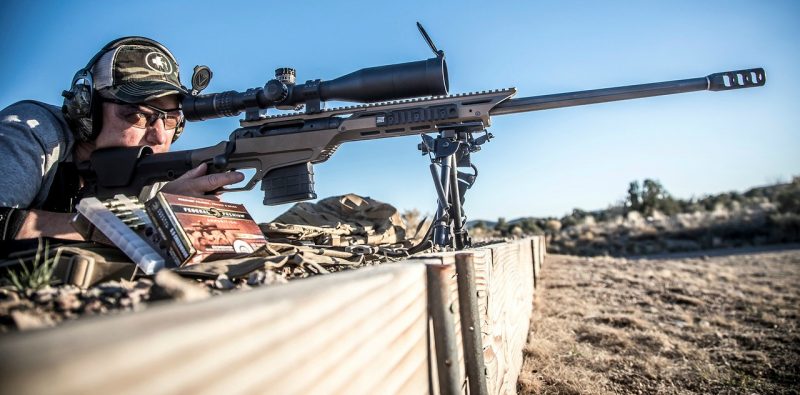
Of course, it takes high-quality gear to get the job done at long range, and for that reason I chose to match my Savage 110 BA Stealth Evolution long-range rifle with a Burris XTR II 5-20x50mm riflescope. (Click here to read my review of the Savage bolt-action rifle in 6.5 Creedmoor.)
So, why did pick this particular scope, and how did it perform?
Let me begin by saying I’m relatively new to this long-range shooting phenomena, so I needed to spend a lot of time online learning. Gunsite does a good job with explaining the gear requirements for their various classes, and I relied heavily on their advice. Thankfully, the “Precision Rifle Equipment Requirements” were very specific. From rifles and telescopic sights to spotting scopes and load-bearing equipment, the website was tremendously helpful.
After reading through this information, it became clear that the best optic system included a spotting scope and a riflescope with the same reticle. In other words, if my riflescope had a reticle in minutes of angle (MOA), then the same should be true for my spotter. If my riflescope’s reticle was in mils, then my spotter’s reticle should be in mils.
Even though coming from a hunting background I was more familiar with MOA than mils, I decided to go with the system that seemed to be the most common among diehard long-range shooters — mils. And here’s where I think I made an even smarter decision: To help me learn this new system the fastest, I choose a spotting scope and riflescope that not only both were in mils, but they had the identical mil reticle design (there is really no standard design for mil reticles in various optics).
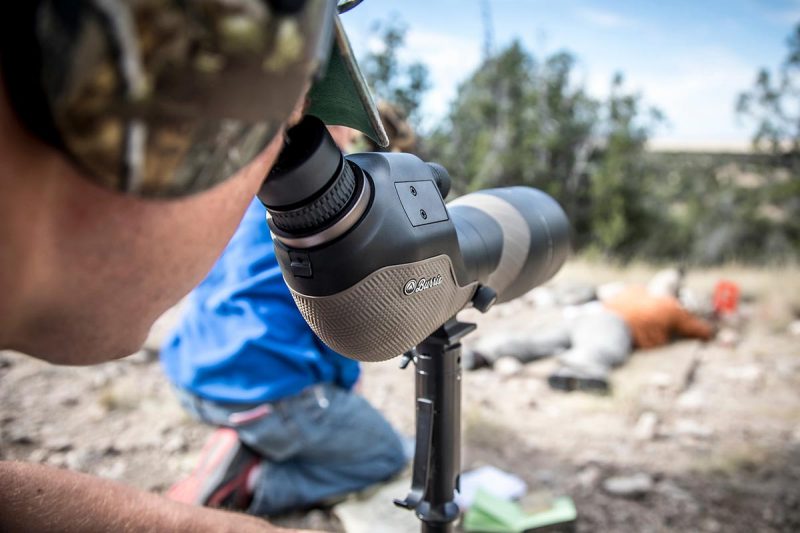
Specifically, I went with a Burris Signature HD spotting scope with an optional 30x eyepiece that featured the SCR Mil reticle. (Click here to read my review of this outstanding spotting scope.) To ensure complete compatibility in my optics, I topped my rifle with the Burris XTR II 5-20x50mm riflescope with the same SCR Mil reticle (riflescope model No. 201042).
Reticle Review
Before I cover the Burris riflescope and how it performed for me in the field, let me take a moment to discuss the SCR Mil reticle. SCR stands for “special competition reticle,” and while I’m far from a long-range rifle competitor, I wanted to give myself the best chance of success at Gunsite.
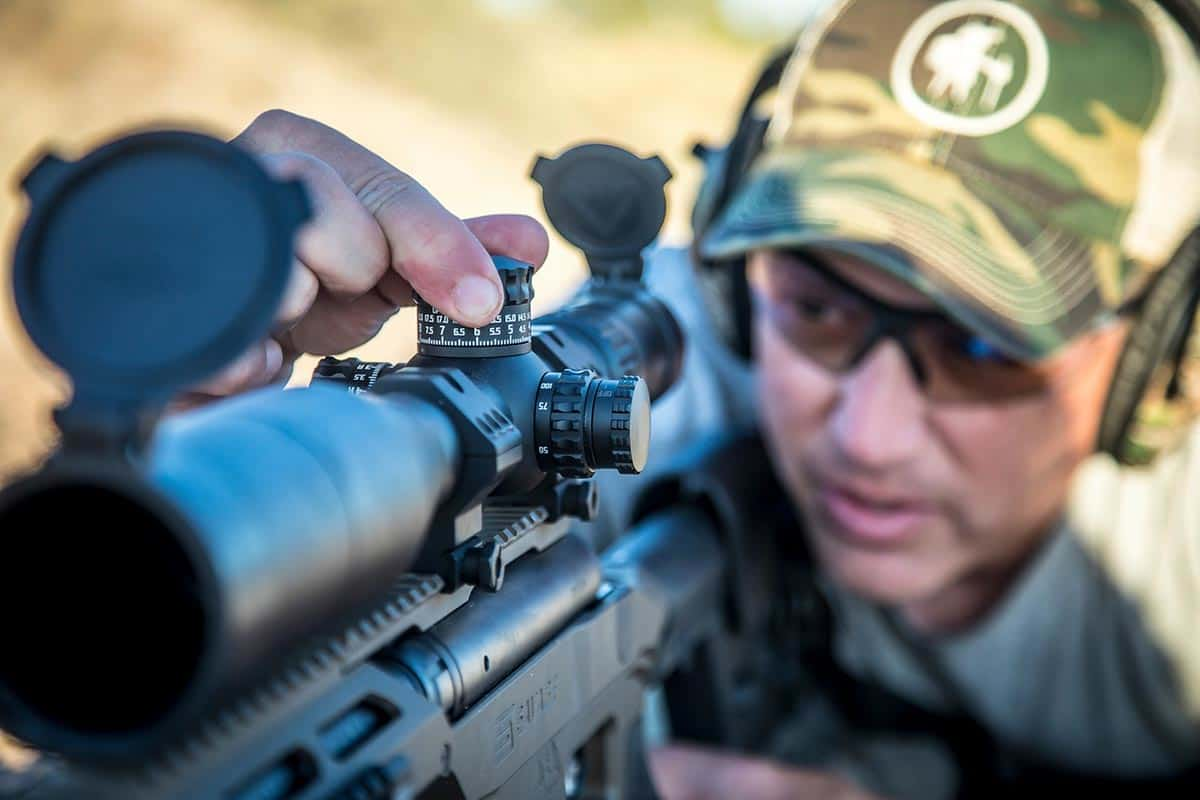
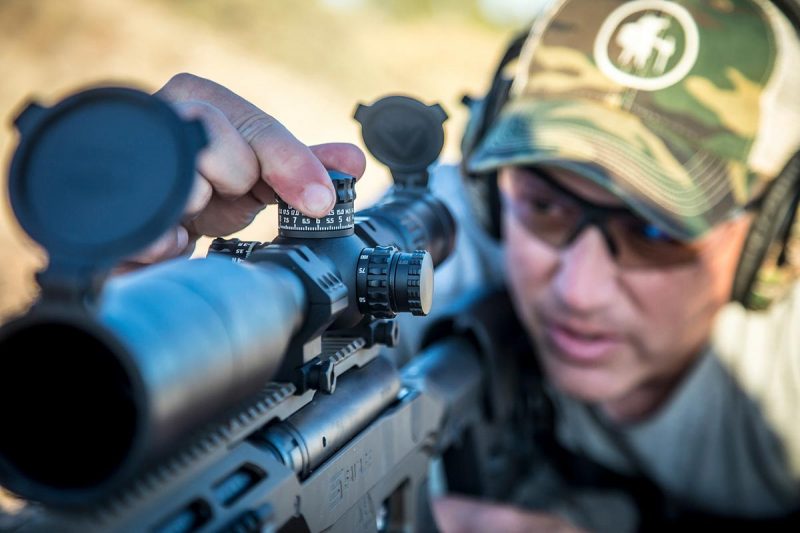
As you can see in the graphic below, the SCR Mil has an illumination option (the red markings), which is great for any low-light situation. I didn’t use this feature a lot while at Gunsite, but during our one evening of after-dark instruction/shooting, it was as if I had an unfair advantage over my fellow classmates. You can easily adjust the illumination to one of 11 brightness settings with a simple turn of the knob (located on the left next to the parallax adjustment).
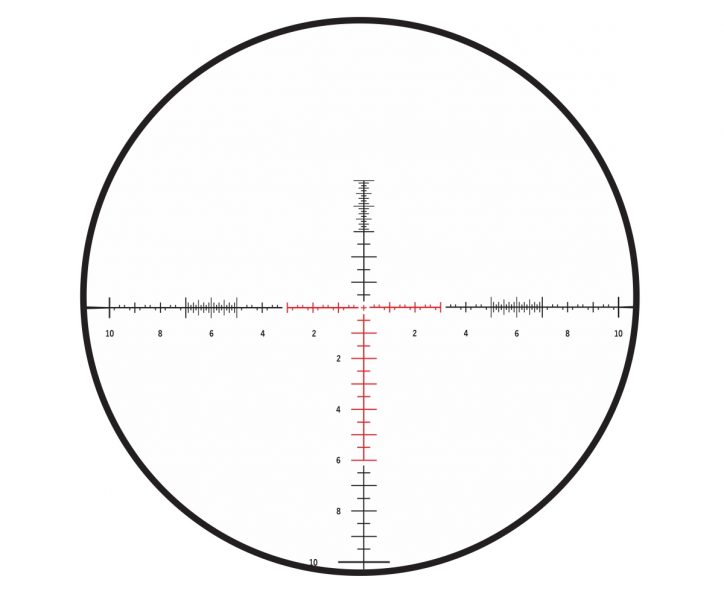
As for the reticle design itself: The hold-over lines (meaning up and down) are in .5 mils, and the windage hold-off lines (right and left) are in .2 and 1 mil. At the top, left and right extremes, there are .1 mil ranging brackets.
So, why does this matter?
As we learned from Gunsite Rangemaster Cory Trapp, you can use a front-focal plane riflescope such as the Burris XTR II to measure objects of known size and then determine distance based on this measurement. While it’s true that most long-range shooters today rely on laser rangefinders to determine shot distance, RM Trapp wanted to teach us the basics, those skills learned by snipers since the very beginning.
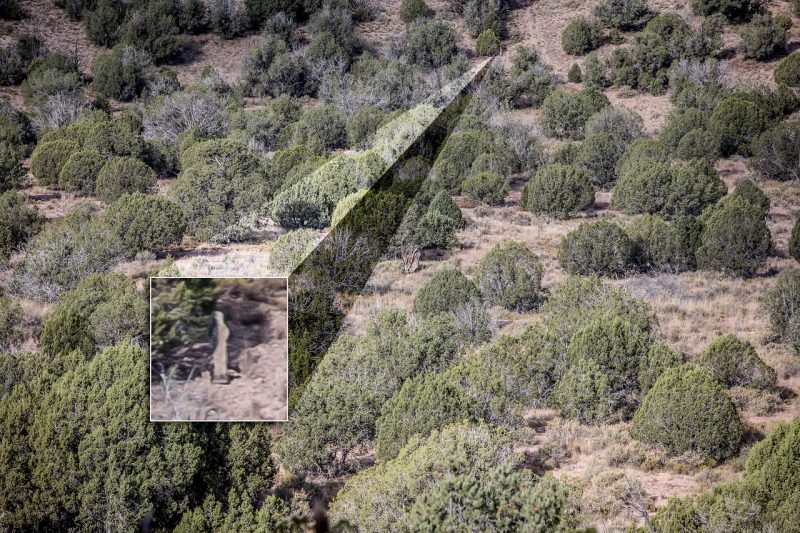
For example, let’s say I look through my Burris XTR II at a standard beer bottle — 9 inches tall — resting on a table. By moving my scope’s vertical crosshair over the bottle (using those fine .1 mil lines at the top of the scope’s reticle), I determine that the height of the bottle is between .60 and .70 mils; call it .65 mils. Next, using a handy slide-rule device known as a Mildot Master, I see that this means the range to the beer bottle is about 385 yards.
While at Gunsite, we measured lengths and widths of objects/targets constantly in our riflescopes and spotting scopes, and having the same super-detailed SCR Mil reticle in both optics made all the difference in the world.
After range is determined, the shooter in a two-man sniper team adjusts his elevation turret for the given distance — based on his D.O.P.E. (Data On Previous Engagements) card — and then waits for instructions from the spotter for a windage hold.
The discussion goes something like this:
Shooter: “On target” (meaning, they have the target in their scope, and have already dialed in the elevation turret for distance)
Spotter: “Spotter ready” (meaning, he has the target in his spotting scope, and he knows what he’s going to call for wind)
Shooter: “Shooter ready” (meaning, his gun is off safe, he’s taken the slack out of the trigger, and he’s focusing on his breathing and is ready to fire at a moment’s notice)
Spotter: “Left 1.5” (meaning, hold into the wind, left 1.5 mils, and immediately press the trigger to the rear)
Shooter: No talking, just Bang! (meaning the shooter simply moves the crosshairs to the left and then fires; the shooter immediately cycles the bolt while watching the target in the scope)
Spotter: “Left 1.0” (meaning, we missed the target and our new hold is left 1.0 mils)
Shooter: Again, no talking, just Bang!
As you can see here, precision and speed are both required. While elevation adjustments for the first shot are almost always handled by adjusting the turret, the windage holds are done by looking at the windage markings on the crosshairs and simply holding left or right.
Burris XTR II Features and Functions
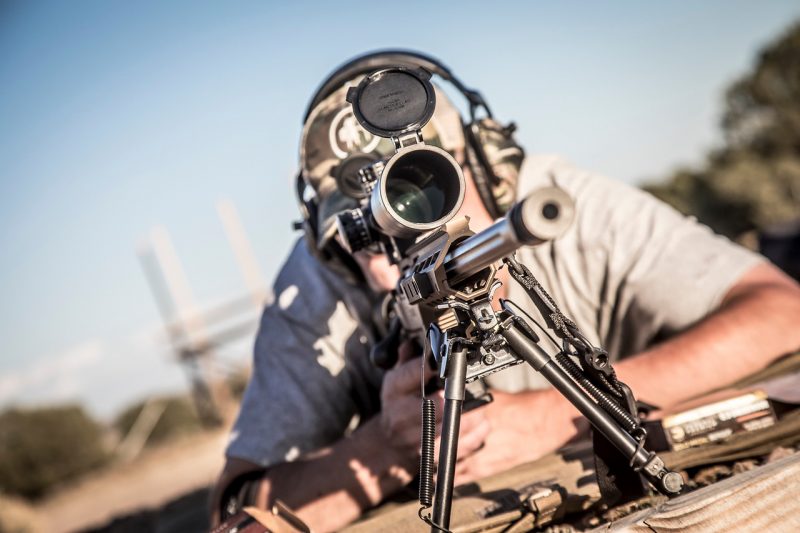
Most of the riflescopes I’ve carried on big-game hunts featured 1-inch-diameter tubes, and a few times I’ve used models with the larger 30mm tubes. But when the Burris XTR II arrived at my home via UPS, I was amazed by the size/thickness of a 34mm tube. Even though the scope wasn’t super long (14.9 inches) or super heavy (30.9 ounces), it looked tough enough to drive nails through a 2×4.
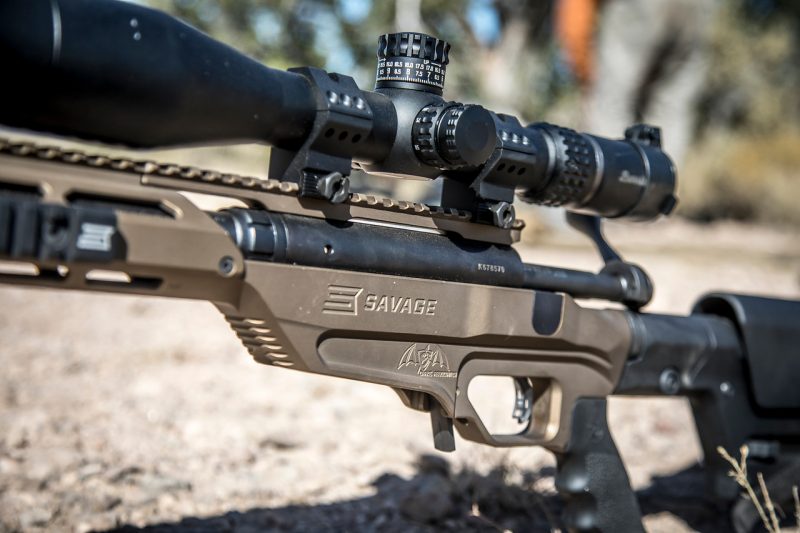
As I said earlier, this is a front-focal plane reticle design, meaning the reticle size increases or decreases as magnification is increased or decreased. This means that trajectory compensation is always correct regardless of power setting.
You can click here to read and learn about all of the Burris XTR II’s features, so I’ll touch on those that really came into play while at Gunsite.
- One full revolution/turn of the elevation turret equals 10 mils, and because my 6.5 Creedmoor required only 7.5 mils of adjustment to hit targets at 1,000 yards, I never had to rotate the turret even one full revolution. Trust me: My classmates with other scope brands/designs had to rotate their elevation turret a lot more, which at times resulted in confusion as to which revolution they were on. My Burris XTR II was super simple to adjust, and each click — .1 mil — was something I could see, feel and hear.
- All the scope adjustments I made for elevation and windage during my initial sight-in at Gunsite (100 yards on paper) moved bullet impact the correct amount. And the same held true as I increased the yardage. Under RM Cory Trapp’s direction, we also shot a “box test” to test the scope’s tracking (making large adjustments up, then left, then down, then right, which should bring you back to your original starting point), and the Burris XTR II passed with flying colors.
- When we left the range and then climbed into the high desert hills, the brightness and clarity of the scope was put to the test. Most often we had to shoot at camo steel targets of various shapes and sizes hidden (often in deep shade of a juniper tree/bush) across the landscape, and I could see my targets easily. And because I often measured target size along the fringes of the scope (where the .1 mil markings are located), I can say definitively that there’s no distortion in color or clarity at the edges. This scope is tack sharp.
- I’d never used a scope with Zero Click Stop adjustment knobs before, but learning the system was easy, and it worked perfectly on this Burris XTR II. RM Trapp had a rule that you dial your elevation back to zero whenever you finish shooting. For a hunter who isn’t used to touching scope turrets after the initial sight-in, it took me a bit to get in the habit, but after a day I was remember to “dial zero” every time.
- In my opinion, the magnification knob was set to just the right amount of adjustment tension; not too tight, not too loose. The same was true for the eyepiece focusing and the parallax adjustment knob.
- When shooting at targets at long, long range — say 700 yards and beyond — I paid special attention to the parallax (side focus) feature. And again, with RM Trapp explaining how to see whether I had the setting adjusted properly for specific targets, my accuracy was astounding.
Did I submerge the scope to check whether it’s indeed waterproof? Did I have my instructor drive over it with his pickup to test durability? Did I freeze it overnight and then check it in the morning? No, no and no. But I didn’t baby the optic during my 5 days at Gunsite, and for a week it rode around in the back of pickup (me holding the rifle) as we moved from spot A to spot B.
And I’m embarrassed to admit this, but twice I failed to adjust the bipod legs just right when setting my unloaded rifle off to the side, and strong wind gusts caused the rifle/scope combo to fall over on the rocks, resulting in a couple of scratches to the scope body. But it never lost its zero, and all week the elevation adjustments remained true.
If you’re in the market for top-notch long-range optic, I highly recommend the Burris XTR II 5-20x50mm riflescope. At $1,379 it’s not inexpensive, but it won’t break the bank, either. It’s a serious scope for serious shooters. Period.